Slayers 2 bosses and what they drop
Walk up to a world boss and the game prints its whole loot table under the health bar, with a chance beside every item. The tables below are read off those bars, boss by boss. Most items sit at 3% or 5%, which is why forty kills without a katana is bad luck rather than a bug.
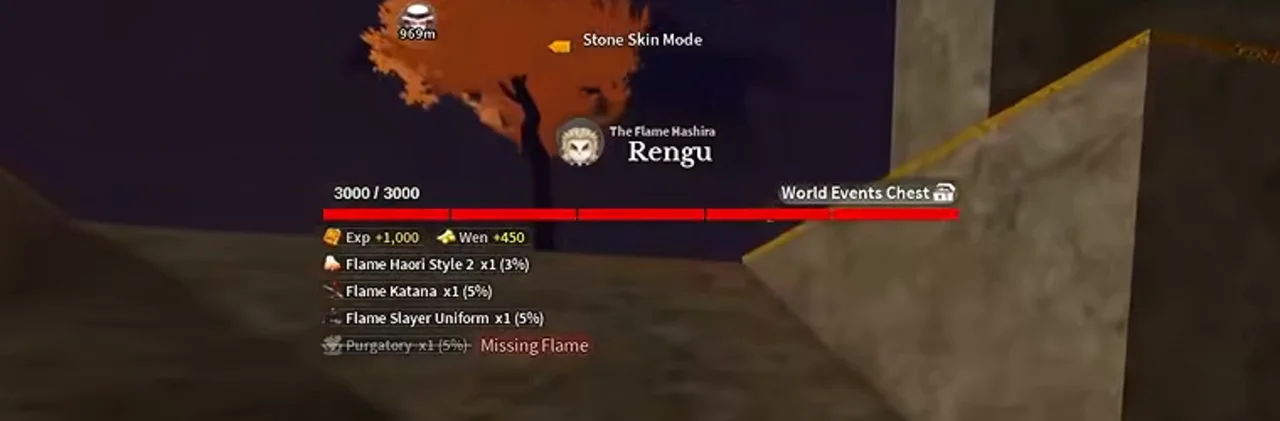
The Flame Hashira Rengu: the health bar, and under it every drop with its chance, exactly as the game prints them.
Frame at 4:33 of All Breathing Trainer Locations & Requirements | Project Slayers 2 Slayers Guide!, recorded by revolver agz — a player’s video, not an official image
How many kills is normal?
At 5%, it takes 45 kills before nine players in ten have the item. At 3%, the rate for every haori, it takes 76. Pick a boss and put in your own count.
Chance of at least one Serpent Haori in 30 kills, at 3%
60%
So about 40% of players who kill Obari 30 times still have nothing.
- 50% sure
- 23
- kills
- 90% sure
- 76
- kills
- 99% sure
- 152
- kills
3% is the chance printed under Obari's health bar in release-day footage. Every kill is treated as a separate roll. If the game has a pity counter, nobody has shown it on screen.
The drop lists on record
The 13 full world bosses share the same frame: 3,000 health, a World Events Chest, 1,000 experience and 450 Wen per kill. The skill line on each (the move scroll) is struck through for a player who does not qualify, with the reason beside it: Must be Slayer on a breathing move, or Missing plus the style or art. Names in brackets are the characters players usually call them by.
| Boss | Health · chest | Drops and chances |
|---|---|---|
| Obari (Obanai) The Serpent King | 3,000 · World Events Chest +1,000 exp, +450 Wen |
|
| Zentaro (Zenitsu) The Thunder King | 3,000 · World Events Chest +1,000 exp, +450 Wen |
|
| Giyen (Giyu) The Water Hashira | 3,000 · World Events Chest +1,000 exp, +450 Wen |
|
| Saneri (Sanemi) The Wind Hashira | 3,000 · World Events Chest +1,000 exp, +450 Wen |
|
| Shinora (Shinobu) The Insect Hashira | 3,000 · World Events Chest +1,000 exp, +450 Wen |
|
| Tengai (Tengen) The Sound Hashira | 3,000 · World Events Chest +1,000 exp, +450 Wen |
|
| Rengu (Rengoku) The Flame Hashira | 3,000 · World Events Chest +1,000 exp, +450 Wen |
|
| Nezura (Nezuko) The Pyrokinetic Demon | 3,000 · World Events Chest +1,000 exp, +450 Wen |
|
| Datai (Daki) The Obi Demon | 3,000 · World Events Chest +1,000 exp, +450 Wen |
|
| Gyutai (Gyutaro) The Blood Sickle Demon | 3,000 · World Events Chest +1,000 exp, +450 Wen |
|
| Domae (Doma) The Cryokinetic Demon | 3,000 · World Events Chest +1,000 exp, +450 Wen |
|
| Akazo (Akaza) The Shockwave Demon | 3,000 · World Events Chest +1,000 exp, +450 Wen |
|
| Fujiko The Bladed Wagasa | 3,200 · Ice Chest +700 exp, +315 Wen |
|
| Water Trainee Sabito Mini Boss | 600 · Common Chest +185 exp, +83 Wen |
|
| Stone Trainee Mini Boss | 600 · Common Chest +185 exp, +83 Wen |
|
| Thunder Trainee Mini Boss | 600 · Common Chest +185 exp, +83 Wen | Experience and Wen only |
| Mother Bear | 525 · Common Chest +180 exp, +80 Wen | Experience and Wen only |
| Sumari (Susamaru) The Temari Demon | 3,000 · World Events Chest +1,000 exp, +450 Wen |
|
All of these were read from footage uploaded on release day. The developer’s v.09 note says it increased all boss skill drop rates by 5%, so every skill line is now higher than shown here; the other lines were not mentioned. Fujiko is the odd one out, with 3,200 health, an Ice Chest and a 1.8% outfit.
What the bars look like
A struck-through line is one this player cannot get yet, with the reason in red beside it. Gyutai’s Blood Sickles, Domae’s War Fans and the Stone Trainee’s Axe and Mace are the only 7% items in the set.
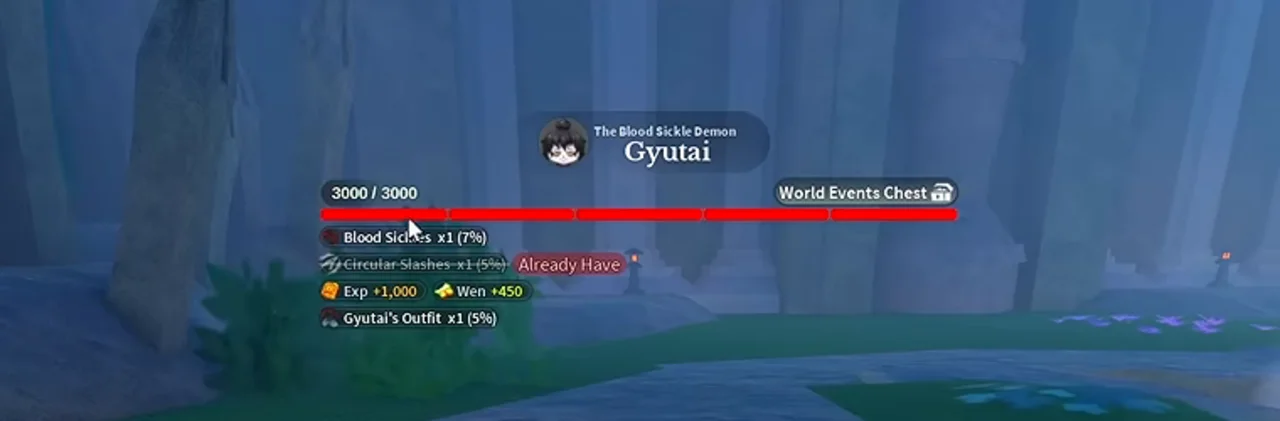
The Blood Sickle Demon Gyutai: the health bar, and under it every drop with its chance, exactly as the game prints them.
Frame at 2:46 of ALL Boss Locations & Boss Drops In Project Slayers 2 (BEST BOSS FARM), recorded by tana — a player’s video, not an official image
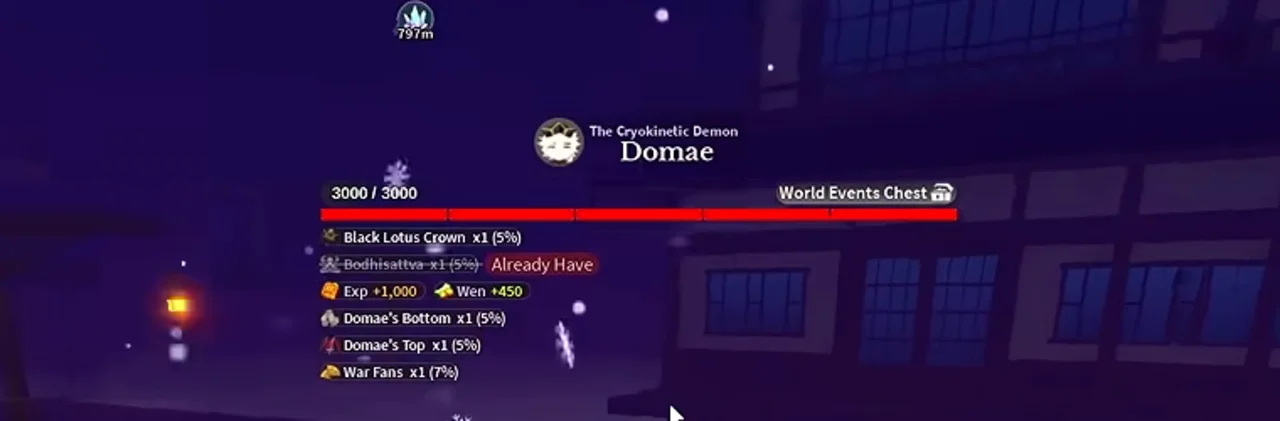
The Cryokinetic Demon Domae: the health bar, and under it every drop with its chance, exactly as the game prints them.
Frame at 5:36 of ALL Boss Locations & Boss Drops In Project Slayers 2 (BEST BOSS FARM), recorded by tana — a player’s video, not an official image
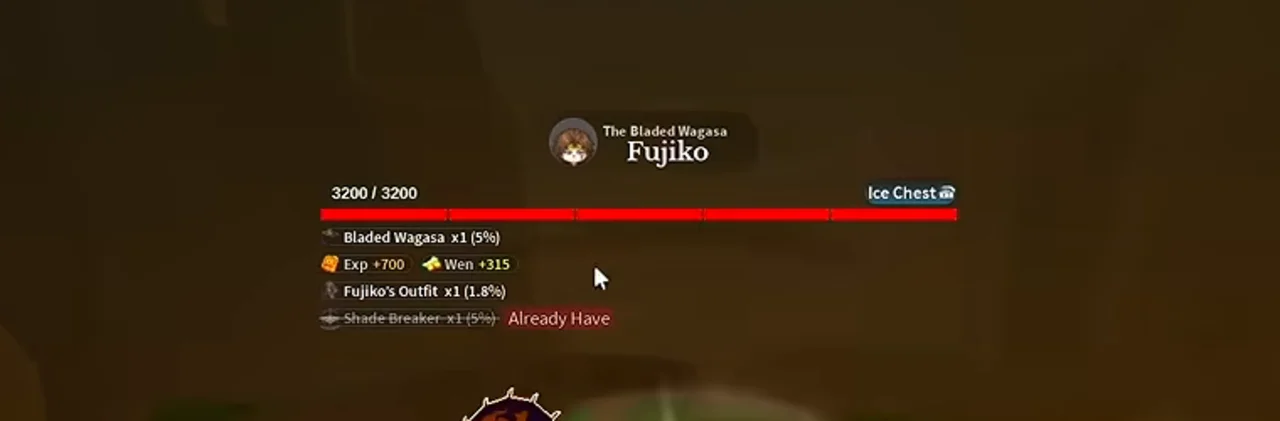
The Bladed Wagasa Fujiko: the health bar, and under it every drop with its chance, exactly as the game prints them.
Frame at 4:27 of ALL Boss Locations & Boss Drops In Project Slayers 2 (BEST BOSS FARM), recorded by tana — a player’s video, not an official image
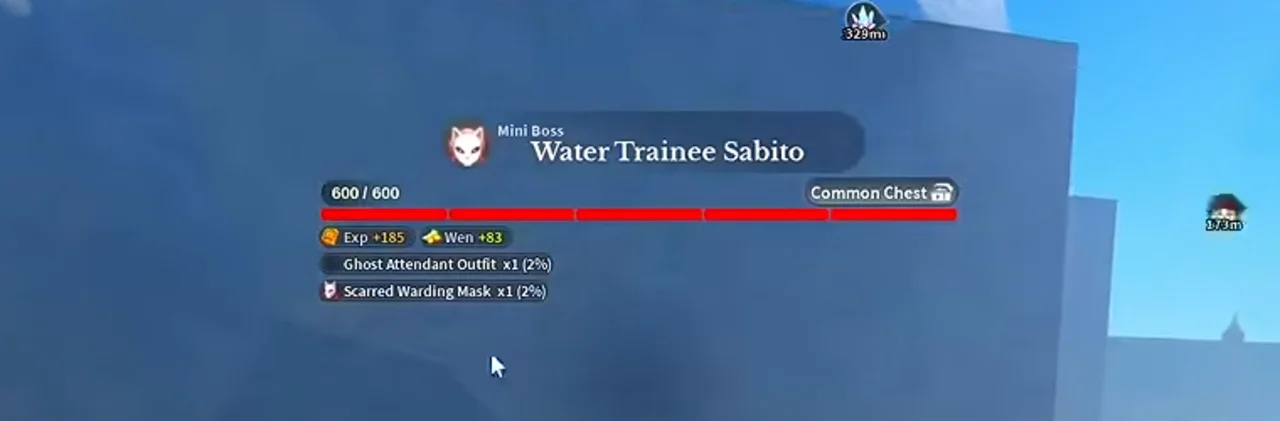
Mini Boss Water Trainee Sabito: the health bar, and under it every drop with its chance, exactly as the game prints them.
Frame at 1:51 of ALL Boss Locations & Boss Drops In Project Slayers 2 (BEST BOSS FARM), recorded by tana — a player’s video, not an official image
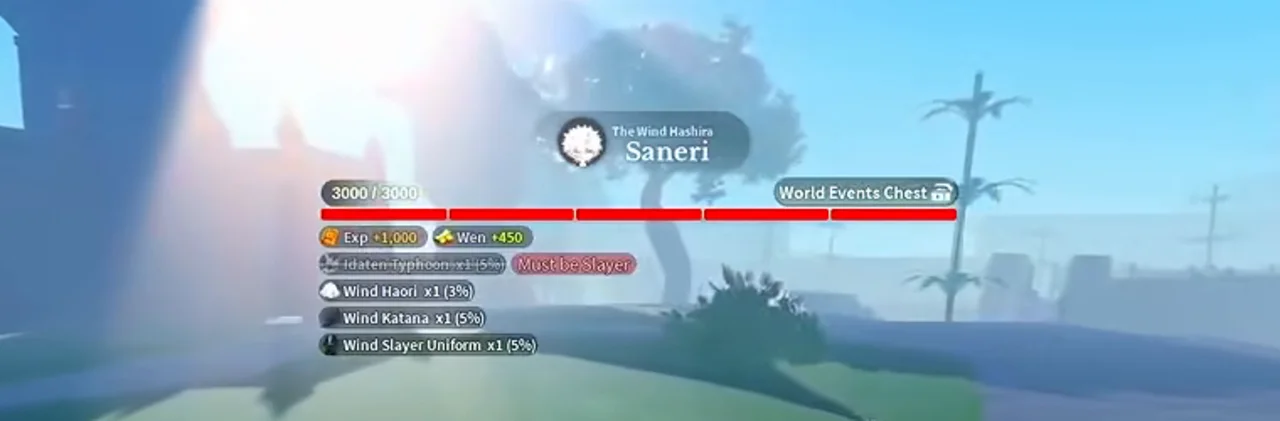
The Wind Hashira Saneri: the health bar, and under it every drop with its chance, exactly as the game prints them.
Frame at 3:06 of ALL Boss Locations & Boss Drops In Project Slayers 2 (BEST BOSS FARM), recorded by tana — a player’s video, not an official image
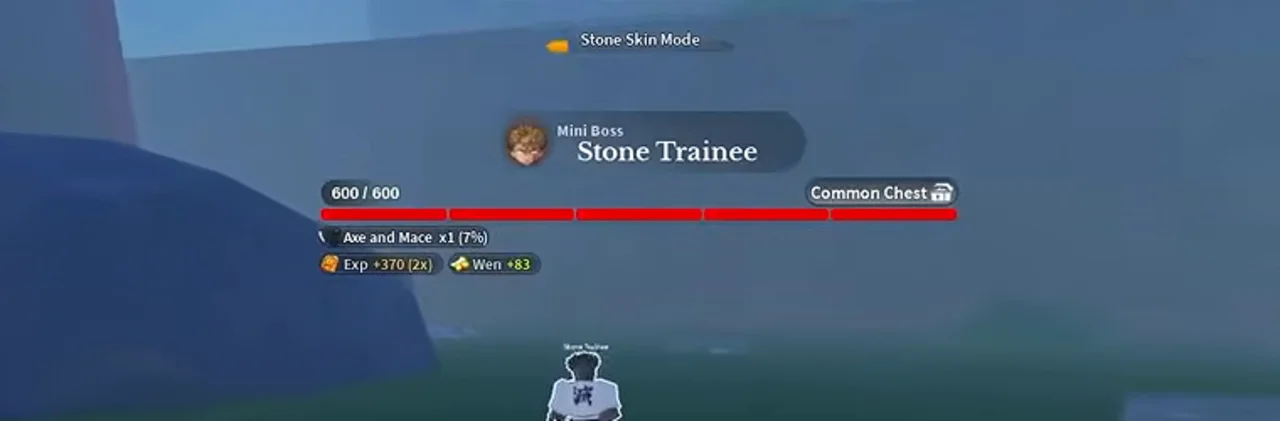
Mini Boss Stone Trainee, 600 / 600, Common Chest, and a single drop: Axe and Mace x1 (7%).
Frame at 16:15 of All Breathing Trainer Locations & Requirements | Project Slayers 2 Slayers Guide!, recorded by revolver agz — a player’s video, not an official image
Bosses that only fight at night
Walk up to Sumari, Yahari or Reaper in daylight and the spot where the health bar would be says Come back at night instead. Sumari’s bar was caught at night in the trainer-route video, so its table is above, with a demon-only move scroll. Yahari’s and Reaper’s tables have not appeared in any of the recordings this page uses. The same night rule covers Muzan and the horned demons that drop Beast Cores.
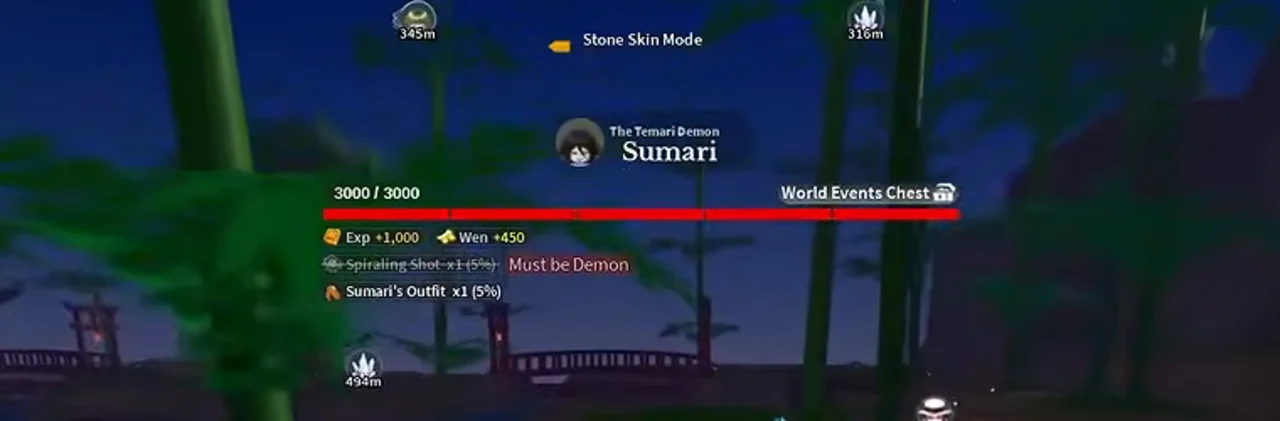
At night: The Temari Demon Sumari, 3000 / 3000, World Events Chest. Spiraling Shot x1 (5%) is struck through with Must be Demon; Sumari's Outfit x1 (5%) is not.
Frame at 15:06 of All Breathing Trainer Locations & Requirements | Project Slayers 2 Slayers Guide!, recorded by revolver agz — a player’s video, not an official image
- Sumari (Susamaru), The Temari Demon
- Yahari (Yahaba), The Arrow Demon
- Reaper, Sonic Reaper Demon
ALL Boss Locations & Boss Drops In Project Slayers 2 (BEST BOSS FARM)
Recorded by tana on YouTube, a player’s video, not an official one
The whole boss route in one run. Each bar in the table above is from this video; the frame links jump to the exact second.
Before you farm one boss for its katana
Skill scrolls need the path
To a player who is not a Slayer, Zentaro’s bar shows Flaming Thunder God struck through with
Must be Slayer. Learn the style first: the breathing checker shows what each trainer wants.Each hashira is also a trainer
Zentaro, Rengu, Shinora and Tengai each appear on screen both as a trainer nameplate and as a boss bar, and guides name Obari as the Serpent trainer too. Paying the trainer and beating the boss are separate things.
Demon arts drop here too
Nezura, Datai, Gyutai, Domae and Akazo carry the demon moves. See Blood Demon Arts for which art each one needs.